If you have a Lenovo laptop and are having battery charging issues due to the power supply connector!
In today’s post, we’ll go over step-by-step instructions for identifying the pinout and securely replacing your Lenovo notebook’s power supply connector.
With the appropriate instructions and a few basic tools, you will be able to complete this procedure with simplicity and save money by not having to purchase a new power supply for your laptops.
So, let’s get started with our step-by-step guide, which we’ve included below with illustrative photographs “real from the repair of the power supply of my notebook” to help you understand.
Step 1: Identify the Problem
Before attempting to repair a connector or cable, it is critical to rule out other possible causes of failure. Before proceeding, we recommend that you do a number of diagnostic tests to check that the connector is, in fact, the source of the problem.When you connect the charger cable to your laptop and find that the battery is not charging or that the connected power supply indicator LED does not light up, then check thoroughly to determine if there is an underlying problem.
Power socket not working:
Check with the multimeter by setting the selector to AC voltage to see if there is power in the mains.Power supply cable damaged:
Likewise, use the multimeter to check that the cable is intact, with a cable continuity test, with the cable out of the mains.DC output connector cable:
Check the dc output cable or connector for voltage with a multimeter; a voltage of 19Vdc should be measured.Burnt-out power supply:
If these initial basic diagnoses are unsuccessful, there may be a problem with the power supply.Faulty DC connector: If your notebook only identifies power when you swing the cable, rub the connector, or have to bend the cable at the connector, etc… it is possible that there is a problem with the connector/cable.
Step 2: Gather the Necessary Tools
To replace or repair the power supply connector, you will need some basic tools, such as:Multimeter: this will be used to identify the voltage of the power supply and the correct polarity.
Stylus or small cutting knife: This will be used to cut the protective cover of the power supply connector.
Cutting pliers: used to strip the cable and make the ends for soldering.
Soldering iron and tin: This will be used to solder the cable and the connector’s internal resistor.
Make sure you use the correct tools to avoid accidents or major damage to the power supply or even the laptop
Step 3: Identifying the Lenovo Power Supply Connector Pins
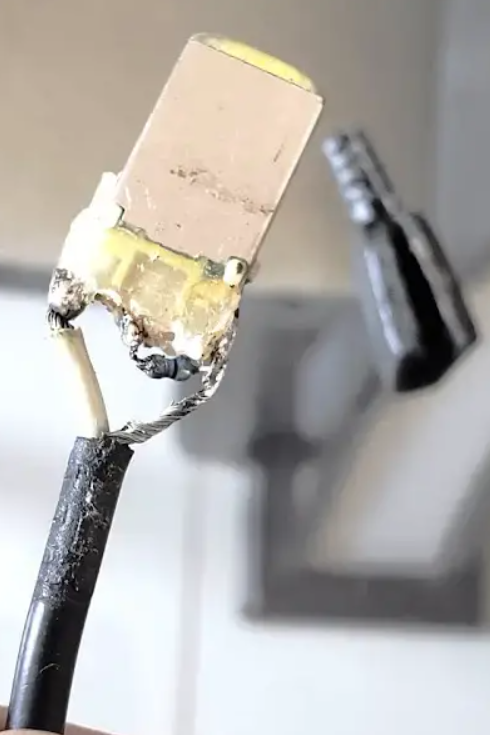
Before starting the repair process, unplug the power supply from the power socket. Then check that your power supply plug is identical to the one illustrated in picture below.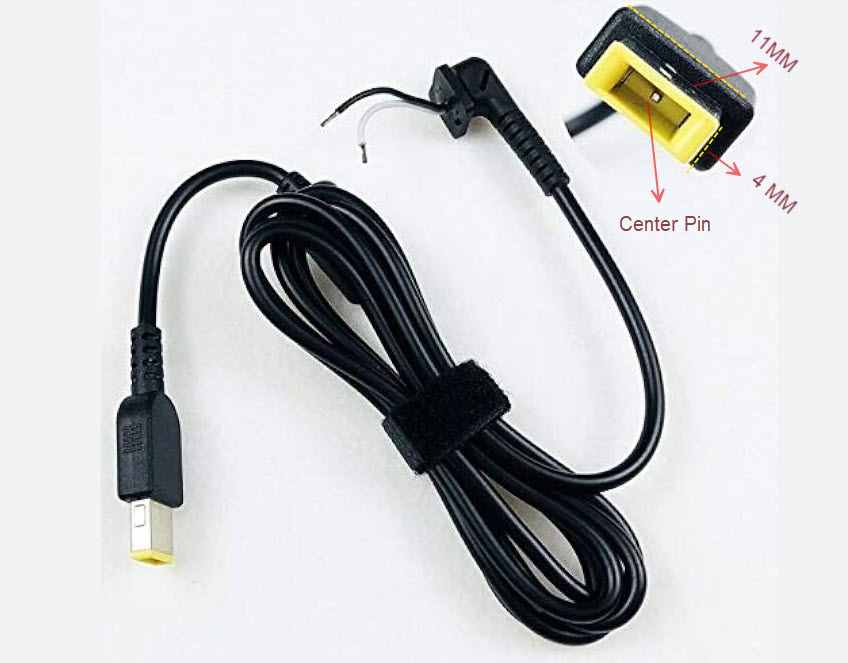
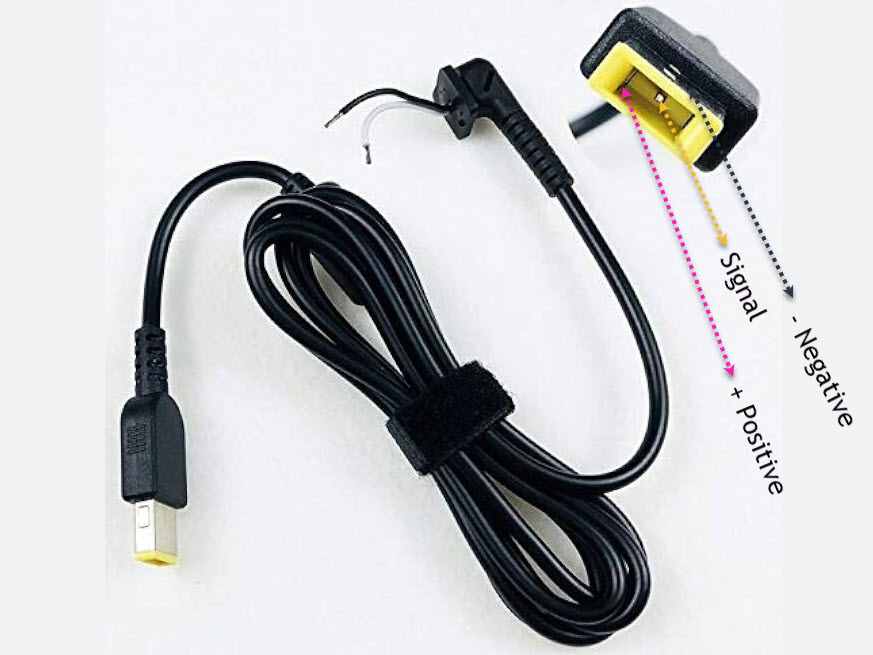
If your connector is identical to the one shown above, let’s move on. In picture 3 below, we have the connection diagram for the Lenovo power supply connector. It’s quite simple, but it’s difficult to find any concrete information about it, so much so that we can’t even identify the name, just the “USB type” connector. If you know, let us know in the comments.
Step 4: Open the Lenovo Power Supply Connector.
To open the power supply jack or connector, whatever you want to call it, use a stylus or sharp material, very carefully so as not to hurt yourself, cut the protective cover, or casing of the connector, from the side, and remove the jack from the casing, as illustrated in picture 4 below.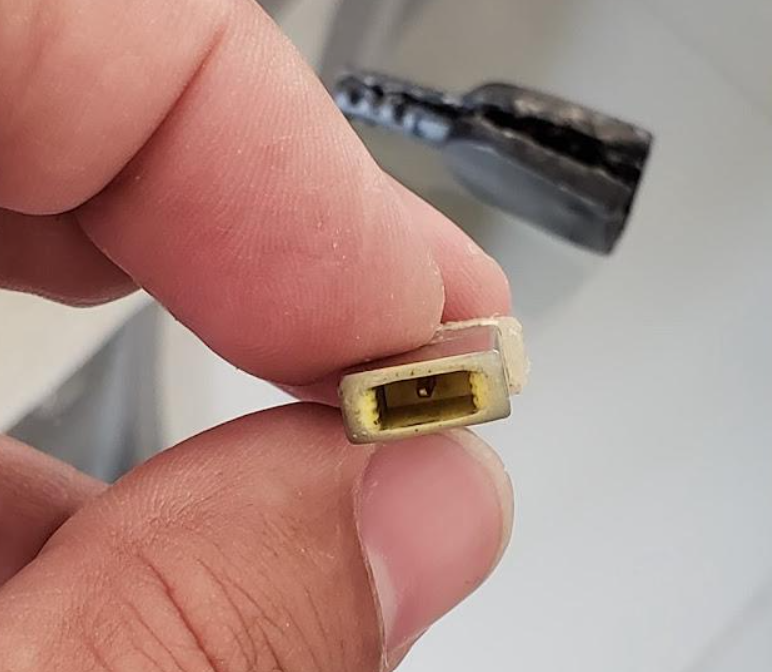
After separating the casing from the connector, we can also see the back of the connector with its 3 pins, as shown in picture 5 below.
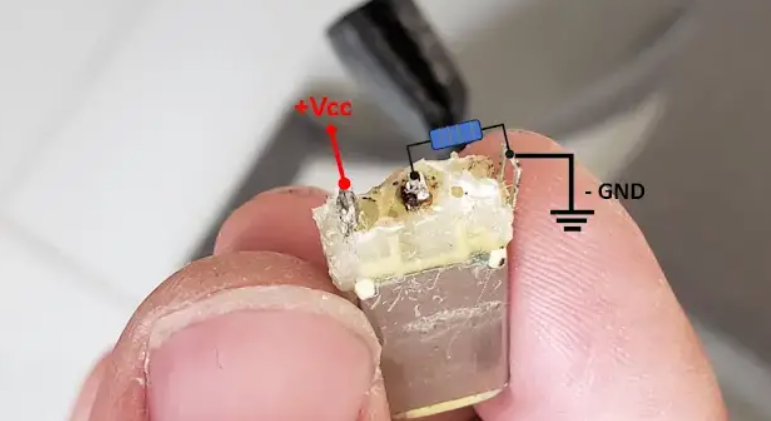
As you can see, it comes with a resistor connected between the centre pin and the connector’s negative pin, easily identified by the side fin that is connected to the connector’s negative metal encapsulation.
When I removed the protection from the connector, the resistor was slightly damaged and it was difficult to identify its colours, so as it wasn’t damaged, I measured its resistance to confirm what I thought it was.
Using the multimeter, we confirmed that it was a 280Ω resistor, as we can see from the measurement made with the multimeter, illustrated in picture 6 below.

Step 5: Identifying the Lenovo Power Supply Pinout
On the power supply’s Jack connector, you’ll find three essential pins: one in the centre, one on the left and one on the right.Identifying these pins is a relatively simple process, with special focus on the GND (ground) pin, which can be readily identified by the presence of a fin attached to the connector’s metal housing, as exemplified in Picture 7 below.
Step 6: Soldering the DC Cable to the Connector
Now it’s time to solder the dc cable to the power supply connector. Make sure that there is no short circuit in the connector by using a multimeter to test continuity, testing all the connectors and soldering:280Ω resistor: GND pin and centre pin
Positive wire (+): DC pin of the power supply “on the left side of the connector”
Negative wire (-): GND pin of the connector “right side of the connector, “fin attached to the connector’s metal housing”
Once you’ve soldered the cable to the connector, and the resistor, it will look like the image suggested in Picture 8 below.
Step 7: Test operation
With the new connector soldered to the cable, plug the power supply into the power socket and use the multimeter on the voltage scale to measure the power supply’s output voltage on the pins labelled positive (+) and negative (GND).If everything went well, you will measure a voltage of 19Vdc on your multimeter, which means that everything is fine with the power supply. Connect the notebook to the power supply to check that the problem has been solved. Check that the notebook is charging correctly and that the power supply connector is working properly.
Conclusion
Congratulations! You’ve learnt how to repair the power connector on your Lenovo notebook. By following the steps described in this article, you have saved time and money by carrying out the procedure yourself. Always remember to take the necessary precautions when handling any electronic device and, if you don’t feel comfortable, seek the help of a professional.1. Can I use any connector to replace the old one?
No, it is essential to use an original connector, or one compatible with the model of your Lenovo notebook to ensure correct functionality.
2. Is replacing the connector risky?
If done with care and attention, connector replacement can be carried out safely, but always take the necessary precautions.
3. Is it possible to repair a broken connector without replacing it?
In some cases, depending on the damage, it is possible to repair the connector without having to replace it completely, as shown in our article.
4. Can I replace the connector if my notebook is still under warranty?
If your Lenovo notebook is still covered by the warranty, it is recommended that you contact authorised technical support to have it replaced, otherwise you could compromise the warranty.
5. Will replacing the connector solve all charging problems?
Although replacing the connector is an important step, there are other factors that can affect the charging of your notebook. If the problem persists after replacement, it is advisable to seek the help of a specialised technician.
Thank you