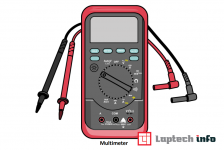
A multimeter is a measurement tool absolutely necessary in electronics. A multimeter allows you to measure what is going on in your circuit. Whenever something in your circuit isn’t working, the multimeter will help you with troubleshooting.
There are different models of multimeters, but all serve to measure voltage, current, resistance and test the electrical continuity.
Selecting a Multimeter:
You can find a wide variety of multimeters with different functionalities and precision. A basic multimeter costs about 5$ and measures the three simplest but most important values in your circuit: voltage, current, and resistance. So, it does
pretty much everything that you need.
If you want a bit more advanced multimeter, I truly recommend you an auto-range multimeter. The auto-ranging is a great advantage, because it saves you of the hassle of having to know which range of value the electrical characteristic you’re measuring falls under. You can find a good multimeter with this characteristic for about 40$. Multimeter However, it’s still pretty straightforward to measure with a multimeter without auto range meter.
Getting familiar with the Multimeter:
a multimeter has 4 essential parts
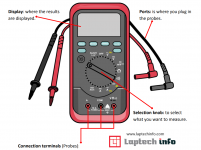
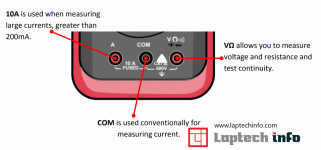
A multimeter has two probes. One is Red and the other is black. You should connect the tip probes to the device/components you want to take measurements, in any measurement you make the black wire is always connected to the COM terminal.
Measuring Voltage:
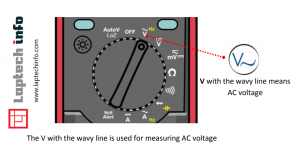
You can measure DC voltage or AC voltage. The V with a straight line means DC voltage and the V with the wavy line means AC voltage. Here, we will only deal with DC voltage.

For measuring the voltage, you should:
1. Setting the mode to V (with the dash and three dots below for DC).
2. Make sure that the red probe is connected to the port with a V next to it.
3. Connect the red lead to the positive side of your component, which is where the current is coming from.
4. Connect the COM lead to the other side of your component
5. Read the value on the display.
Example:
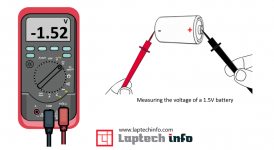
Let’s start measuring the voltage of a 1.5 volt battery. You know that you’ll have approximately 1.5V. So, you should select a range with the selection knob that can read the 1.5V. So you should select 2V in the case of this multimeter.

And, what if you switch the red and the black probe? Nothing dangerous will happen. The reading on the multimeter has the same value, but it’s negative
Checking the Continuity:
Most multimeters now provide a feature that allows you to test the continuity of your circuit. This allows you to easily detect bugs such as faulty lines. In other words: testing the continuity basically means that you’re testing the resistance between two points. This allows you to detect if two points are connected. To use this functionality select the mode that look like a speaker.

How does it work?
If there is very low resistance, which is less than a few ohms, the two points are electrically connected and you’ll hear a continuous sound. If the sound isn’t continuous or if you don’t hear any sound at all, it means that what you’re testing has a bad connection or it’s not connected at all.
Note: To test continuity the multimeter should be connected.
Touch together the two probes and, as they are connected, you’ll hear a continuous sound.
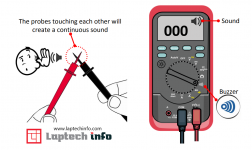
To test the continuity of a wire, you just need to connect each probe to the wire tips.

How to test AC Voltage (Alternating Current):
Put your multimeter on the proper AC (Alternating Current) setting. Multimeters can test a variety of different AC and DC currents, but for the purposes of this test you’ll want to be sure it’s set to test AC currents. Take your two probes and insert them into the side slots of your dryer’s wall outlet. Be careful not to touch the tips of your two probes while doing performing this task, doing so could cause the multimeter to malfunction. After you’ve carefully inserted your two probes in the side slots of the outlet take a look at how many volts the multimeter is registering. If you’re plug is working properly your device should be reading between 220-240 volts
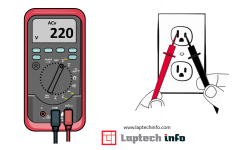
Take the probes and put it into slot. If outlet is working properly your device should be reading roughly 220 volts.
This Part will hopefully give you the basic knowledge on how to use the multimeter
There are different models of multimeters, but all serve to measure voltage, current, resistance and test the electrical continuity.

Selecting a Multimeter:
You can find a wide variety of multimeters with different functionalities and precision. A basic multimeter costs about 5$ and measures the three simplest but most important values in your circuit: voltage, current, and resistance. So, it does
pretty much everything that you need.
If you want a bit more advanced multimeter, I truly recommend you an auto-range multimeter. The auto-ranging is a great advantage, because it saves you of the hassle of having to know which range of value the electrical characteristic you’re measuring falls under. You can find a good multimeter with this characteristic for about 40$. Multimeter However, it’s still pretty straightforward to measure with a multimeter without auto range meter.
Getting familiar with the Multimeter:
a multimeter has 4 essential parts

A multimeter has two probes. One is Red and the other is black. You should connect the tip probes to the device/components you want to take measurements, in any measurement you make the black wire is always connected to the COM terminal.
- The Black probe is always connected to the COM (-).
- The Red probe is connected to one of the other ports depending on what you want to measure

Measuring Voltage:
You can measure DC voltage or AC voltage. The V with a straight line means DC voltage and the V with the wavy line means AC voltage. Here, we will only deal with DC voltage.


For measuring the voltage, you should:
1. Setting the mode to V (with the dash and three dots below for DC).
2. Make sure that the red probe is connected to the port with a V next to it.
3. Connect the red lead to the positive side of your component, which is where the current is coming from.
4. Connect the COM lead to the other side of your component
5. Read the value on the display.
Example:
Let’s start measuring the voltage of a 1.5 volt battery. You know that you’ll have approximately 1.5V. So, you should select a range with the selection knob that can read the 1.5V. So you should select 2V in the case of this multimeter.

And, what if you switch the red and the black probe? Nothing dangerous will happen. The reading on the multimeter has the same value, but it’s negative

Checking the Continuity:
Most multimeters now provide a feature that allows you to test the continuity of your circuit. This allows you to easily detect bugs such as faulty lines. In other words: testing the continuity basically means that you’re testing the resistance between two points. This allows you to detect if two points are connected. To use this functionality select the mode that look like a speaker.

How does it work?
If there is very low resistance, which is less than a few ohms, the two points are electrically connected and you’ll hear a continuous sound. If the sound isn’t continuous or if you don’t hear any sound at all, it means that what you’re testing has a bad connection or it’s not connected at all.
Note: To test continuity the multimeter should be connected.
Touch together the two probes and, as they are connected, you’ll hear a continuous sound.

To test the continuity of a wire, you just need to connect each probe to the wire tips.

How to test AC Voltage (Alternating Current):
Put your multimeter on the proper AC (Alternating Current) setting. Multimeters can test a variety of different AC and DC currents, but for the purposes of this test you’ll want to be sure it’s set to test AC currents. Take your two probes and insert them into the side slots of your dryer’s wall outlet. Be careful not to touch the tips of your two probes while doing performing this task, doing so could cause the multimeter to malfunction. After you’ve carefully inserted your two probes in the side slots of the outlet take a look at how many volts the multimeter is registering. If you’re plug is working properly your device should be reading between 220-240 volts

Take the probes and put it into slot. If outlet is working properly your device should be reading roughly 220 volts.
This Part will hopefully give you the basic knowledge on how to use the multimeter
Last edited:
